Opera is the fastest web browser offering numerous advanced features with a sleek, minimalist design. It is developed by a company headquartered in Oslo, Norway.
This free software is available in 52 languages and runs on Windows, Mac, and Linux operating systems. Opera is one of the most feature-rich internet browsers, offering private browsing, pop-up blocking, tabbed browsing, integrated search, and customizable interface and content—knowing that users have different preferences.
This browser is lightweight, making it ideal for notebooks or PCs with limited storage. It comes with its own email client and RSS reader, eliminating the need for separate applications like Outlook. Opera Turbo is a built-in feature that can be activated during slow internet connections to speed up page loading. Its cache recall is also faster.
The Password Manager feature displays a pop-up when you fill in credentials on a site, allowing you to save passwords for easier access the next time you visit the same website.
One of Opera’s most praised advantages is its ability to compress data traffic by up to 90%, significantly improving page loading speed.
Opera also features “Speed Dial”, which allows users to add up to 25 (or more by editing the speeddial.ini file) links displayed as thumbnails on the new tab page. These thumbnails are automatically generated for visual recognition but can be customized using the Opera Image Dial Generator. Once configured, this feature allows users to quickly navigate to their favorite web pages.
Opera Browser helps reduce data usage when streaming videos while browsing. According to Opera, buffering is significantly reduced compared to previous versions.
Key Features of Opera:
Simple and Intuitive User Interface: Opera’s user interface is designed to be user-friendly and flexible. It offers useful shortcut buttons such as reload, bookmark, and more. Users can also personalize the UI using different themes according to their preferences.
Blazing Fast Speed: Opera is considered one of the fastest web browsers available. Compared to other browsers, it loads web pages more quickly and responds faster.
Effective Data Savings: Opera offers efficient data-saving features, allowing users to browse the web while consuming less data. This is especially useful for users with limited data plans or those traveling in areas with poor network coverage.
Robust Security Features: Opera provides strong security features, including anti-phishing tools and malware protection. These help users avoid harmful websites and protect their devices from malware threats.
Cross-Device Synchronization: Opera allows users to sync their browsing history, bookmarks, and settings across all devices. This is ideal for users who switch between multiple devices or use them simultaneously.
Free Built-In VPN: Opera comes with a free VPN feature that allows users to hide their IP addresses and access blocked websites. This is particularly beneficial for maintaining privacy and bypassing geo-restrictions.
FinePrint is a Windows PC application designed for managing and creating PDF documents. This application comes equipped with a wide range of features that simplify handling PDF files.
Acting as a virtual printer on your computer, FinePrint can be accessed by clicking the Print button in any document processing software you use, such as Microsoft Word or others.
Once the document is sent to FinePrint, you can perform various actions like editing text, removing blank pages, adding digital signatures, cropping pages, deleting text or images, and much more.
Key Features of FinePrint:
There are many Windows PC applications that help manage PDF files such as pdfFactory, PDF Combine for merging PDFs, or Free PDF to All Converter for converting PDFs to other formats.
FinePrint is a favorite among users looking for a feature-rich PDF management application. Its popularity is not without reason. Here are some of the key features and advantages of FinePrint:
PDF Viewer: FinePrint includes a built-in PDF viewer that allows you to view and interact with PDF files directly within the application. This makes it easier to review documents before printing or making edits.
Universal Print Previewer: FinePrint acts as a universal print preview tool that works with all Windows applications. It lets you see exactly how your document will look before it’s printed, helping you avoid errors and unnecessary printing.
Microsoft Signed Drivers: The application uses drivers that are officially signed by Microsoft, ensuring compatibility, stability, and security on Windows operating systems.
Delete Unwanted Pages: You can remove any pages you don’t need, including blank ones or specific sections that are irrelevant, reducing paper and ink usage.
Convert to Grayscale: This feature converts all colored elements in a document to grayscale, allowing you to save colored ink while maintaining readability.
Lighten Content to Save Ink: FinePrint lets you lighten the contents of a document to reduce the amount of ink used when printing—ideal for drafts or internal copies.
Remove Blank Pages: Automatically detect and remove any blank pages from your document to streamline output and save paper.
Crop Pages: Crop margins or unwanted sections of pages to better fit your needs, whether for design purposes or to eliminate unnecessary white space.
Edit Text: Make direct edits to the text in your documents—fix typos, update names or titles, or add notes—without needing to return to the original file in Microsoft Word or another editor.
Sign and Mark Up Print Jobs: Add digital signatures, handwritten annotations, or highlights to documents before printing. Useful for approvals, reviews, or internal notes.
Remove Unwanted Text and Images: Easily delete sensitive or irrelevant content from your documents, including specific text or images, before printing or archiving.
Print Multiple Pages on a Single Sheet: Combine several pages into one sheet of paper to save space and resources—ideal for draft printing or compact document formats.
Print Electronic Letterhead: Use your own customized electronic letterhead when printing, eliminating the need for pre-printed stationery and ensuring a consistent professional look.
Archive Print Jobs: Save and store previous print jobs for future reference or reprinting. This is especially useful for documents that are frequently used or need to be archived for documentation purposes.
Other useful features include digital signature insertion, page cropping, image removal, and more.
If you’re looking for a PDF document management tool that allows you to edit text, remove blank pages, and adjust document colors, FinePrint is definitely an application worth considering.
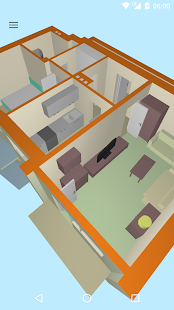
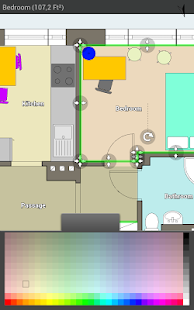
Floor Plan Creator is a versatile application available both as an Android app and as a web-based tool, enabling users to draw, visualize, and share detailed 2D and 3D floor plans directly from their browser or smartphone.
Floor Plan Creator
1 of 7
🏗️ Core Features & Platform Support
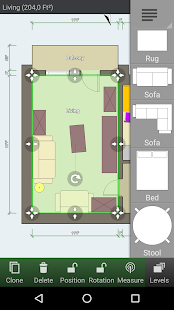
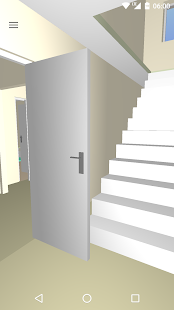
2D & 3D Design: Draw rooms of any shape (with straight walls), add annotations, symbols, and view plans in interactive 3D tour mode.
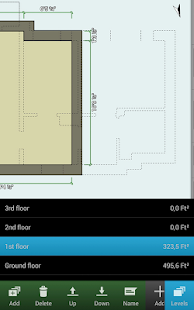
Multi‑floor Projects: Design projects with multiple levels; the app automatically computes rooms’ areas and perimeters.
Symbol Libraries: A robust symbol toolkit includes doors, windows, furniture, electrical and fire-safety icons. Users can also create a personal symbol library for quick reuse.
📐 Smart Measurement Capabilities
Bluetooth Laser Integration: Connect supported laser distance meters (Bosch, Leica, Hilti, Stabila, CEM, and more) to transfer real measurements into your floorplan seamlessly—available on Android and via Web Bluetooth in supported browsers.
Precision & Dimension Tools: Use adjustable dimension lines, measurement locking, tag-based area calculations, and auto‑numbering across floors or object groups.
🧑🤝🧑 Collaboration & Sharing
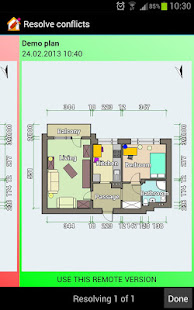
Project Sharing: Share editable projects via links—recipients don’t need an account. You can control whether collaborators can save changes. Generated share links expire when re‑shared, ensuring security.
💳 Pricing & Licensing Options
Android App:
Free: Unlimited projects and floors, in‑app saving, 3D view support.
Basic ($4.99 one-off): Adds cloud sync, high‑res PNG/JPEG export, 3D screenshot export, no ads.
Full ($7.99 one‑off): Also includes PDF export (print-to-scale), DXF, SVG, OBJ export, symbol libraries, and cloud sync.
Web App (SaaS):
Free Plan: Single project allowed.
Standard ($4.95/year per 10 projects pack): High‑res export (PNG, JPEG, SVG), DXF, PDF, OBJ, symbol reuse.
Pro ($6.95/year unlimited): Unlimited projects, exports, personal branding (logo on exports), library support.
Note: Web plans don’t activate Android in‑app upgrades—and vice versa.
⚙️ Workflow & Usability
The typical design process:
Set exterior and interior wall snapping distances.
Drag room shapes into the canvas, modify them by outlining or adjusting corners.
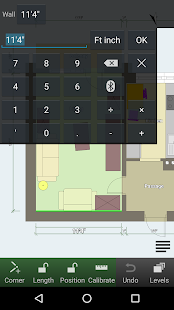
Manually enter wall lengths or lock room dimensions and orientation.
Add furniture and architectural elements using the symbol toolbar.
The user interface supports keyboard navigation (including 3D view), group tagging, color organization, and even transparent objects in 3D. Recent updates also added scale bars, fire escape symbols, auto-cloning tools, and improved zoom precision.
🌟 Why Floor Plan Creator Stands Out
Accessibility: Fully browser‑based with no installation needed (for the web version) plus a capable mobile option.
Precision Tools: It integrates with laser meters, supports CAD export formats, and allows true-to-scale printing.
Flexible Pricing: A generous free tier and affordably priced upgrades, with clear differentiation between Android and web offerings.
Real-time Collaboration: Simple sharing options without requiring accounts make it ideal for working with contractors, designers, or colleagues.
🧾 Conclusion
Floor Plan Creator is ideal for homeowners, DIY renovators, real estate professionals, and even architects seeking an intuitive drafting environment. It combines practical tools—such as measurement integration, export to common formats like PDF, DXF, SVG, and OBJ—with flexibility in device platforms and pricing models. Whether you’re sketching a renovation plan or designing a multi-floor structure, the tool empowers you to produce accurate, shareable, and professional-looking floor plans with ease.
If you’re interested in comparisons with alternatives like Planner 5D, Sweet Home 3D, Magicplan, or Floorplanner, I’d be happy to summarize those too!
HVS paper has become the most popular type of paper among students and office workers. It is widely used for creating reports, college assignments, and various other daily tasks. However, many of us may not actually know what HVS paper really is or what sizes it comes in. We often use it without truly understanding it. Before diving into the main discussion, it’s useful to first understand what HVS paper actually is.
What is HVS Paper?
HVS stands for “Houtvrij Schrijfpapier,” a Dutch term meaning “wood-free writing paper.” HVS paper is a high-quality paper made from well-processed wood pulp. One of its main characteristics is its smooth texture and flat surface, making it ideal for printing clear text and images.
HVS paper is also known for its durability and resistance to aging, which makes it a popular choice for long-lasting documents. It’s no surprise, then, that this paper is commonly found in stores and widely used. The price of HVS paper varies depending on its size and quality.
Types of HVS Paper
There are several types of HVS paper, categorized by color and use:
White HVS: This is the most common and widely used type. It’s typically used for everyday printing, letters, and general document applications.
Colored HVS: Available in various colors such as cream, yellow, blue, and more. Colored HVS is often used to add visual variety to documents or for design purposes.
Watermarked HVS: This paper contains embedded images or text, commonly used for official documents or valuable correspondence.
Coated HVS: With an extra coating, this type is thicker and ideal for color printing. It’s often used for brochures, pamphlets, or other marketing materials.
HVS Paper Sizes
Below are explanations of the different sizes of HVS paper based on standard series classifications. Common sizes of HVS paper include A3, B5, B3, Folio or F4, and Quarto or A3. These sizes are chosen according to their use. For example, students frequently use A4 or F3 sizes. In international standards, HVS paper sizes are divided into the A, B, C, F, and R series.
There are many size options available to suit different paper usage needs. This becomes especially important when printing documents that must meet specific size requirements.
Why is this important? Because knowing the correct paper size is essential for printing documents with the desired results.
If you are still unsure about which paper size to choose, you can refer to the table below.
Type of HVS Paper
Millimeters (mm)
Centimeters (cm)
Inches (in)
A3
297 x 420
29.7 x 42.0
11.69 x 16.54
A4
210 x 297
21.0 x 29.7
8.27 x 11.69
A5
148 x 210
14.8 x 21.0
5.83 x 8.27
B5
176 x 250
17.6 x 25
6.93 x 9.84
F4 or Folio
216 x 330
21.6 x 33
8.5 x 13
Letter or Quarto
216 x 279
21.6 x 27.9
8.5 x 11
Legal
216 x 356
21.6 x 35.6
8.5 x 14
After reviewing the table above, do you now recognize the commonly used HVS paper sizes? This table will help you remember the paper sizes you may need for printing.
From the table, there is a noticeable difference between the F4 and Legal sizes. If you print a document in F4 size while your printer is set to Legal, the printed result will not match properly, and some of the text may be cut off.
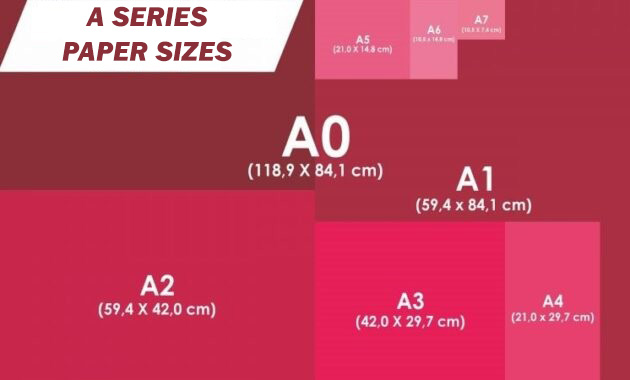
A Series HVS Paper Sizes
a series hvs paper sizes
Paper sizes in the A series are international standards commonly used in publishing, offices, and printing. Some examples of paper sizes in the A series include:
Paper Format
Millimeters (mm)
Centimeters (cm)
Inches (in)
A0
841 x 1189
84.1 x 118.9
33.11 x 46.81
A1
594 x 841
59.4 x 84.1
23.39 x 33.11
A2
420 x 594
42.0 x 59.4
16.54 x 23.39
A3
297 x 420
29.7 x 42.0
11.69 x 16.54
A4
210 x 297
21.0 x 29.7
8.27 x 11.69
A5
148 x 210
14.8 x 21.0
5.83 x 8.27
A6
105 x 148
10.5 x 14.8
4.13 x 5.83
A7
74 x 105
7.4 x 10.5
2.91 x 4.13
A8
52 x 74
5.2 x 7.4
2.05 x 2.91
A9
37 x 52
3.7 x 5.2
1.46 x 2.05
A10
26 x 37
2.6 x 3.7
1.02 x 1.46
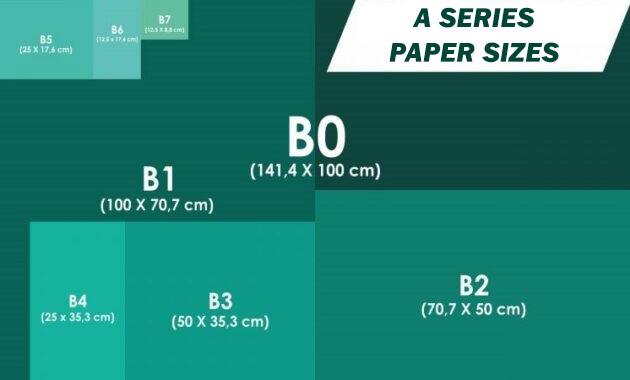
B Series HVS Paper Sizes
b series hvs paper sizes
B series paper is commonly used for printing wall art or posters. The dimensions of B series paper are generally twice the size of those in the A series.
Below is a table showing various paper sizes in the B series.
Paper Format
Millimeters (mm)
Centimeters (cm)
Inches (in)
B0
1000 X 1414
100 X 141.4
39.37 X 55.67
B1
707 x 1000
70.7 x 100
27.83 x 39.37
B2
500 x 707
50 x 70.7
19.69 x 27.83
B3
353 x 500
35.3 x 50
13.90 x 19.69
B4
250 x 353
25 x 35.3
9.84 x 13.90
B5
176 x 250
17.6 x 25
6.93 x 9.84
B6
125 x 176
12.5 x 17.6
4.92 x 6.93
B7
88 x 125
8.8 x 12.5
3.46 x 4.92
B8
62 x 88
6.2 x 8.8
2.44 x 3.46
B9
44 x 62
4.4 x 6.2
1.73 x 2.44
B10
31 x 44
3.1 x 4.4
1.22 x 1.73
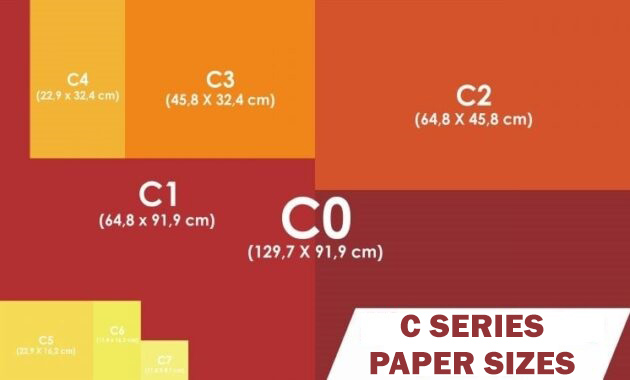
C Series HVS Paper Sizes
c series hvs paper sizes
C series paper sizes are typically used for making postcards, folders, and envelopes. The area of one sheet of C series paper is approximately the geometric mean between the corresponding A and B series sheets.
For example, a C3 sheet has an area roughly equal to the average of an A3 and a B3 sheet combined and then divided by two. In other words, C series paper sizes are slightly larger than both A and B series of the same number.
Below is a table displaying various C series paper sizes:
Paper Format
Millimeters (mm)
Centimeters (cm)
Inches (in)
C0
919 x 1297
91.9 x 129.7
36.10 x 51.06
C1
648 x 919
64.8 x 91.9
25.51 x 36.10
C2
458 x 648
45.8 x 64.8
18.03 x 25.51
C3
324 x 458
32.4 x 45.8
12.76 x 18.03
C4
229 x 324
22.9 x 32.4
9.02 x 12.76
C5
162 x 229
16.2 x 22.9
6.38 x 9.02
C6
114 x 162
11.4 x 16.2
4.49 x 6.38
C7
81 x 114
8.1 x 11.4
3.19 x 4.49
C8
57 x 81
5.7 x 8.1
2.24 x 3.19
C9
40 x 57
4 x 5.7
1.57 x 2.24
C10
28 x 40
2.8 x 4
1.10 x 1.57
F Series Paper Sizes
F series paper sizes are often referred to as folio paper, with the common size being 215 x 330 mm or 8.5 x 13 inches. This paper is typically used in photocopy centers and office environments.
Folio paper has a long history and was one of the traditional paper sizes used in Europe and the British Commonwealth. However, over time, it has gradually been replaced by the A series paper sizes, which have become the international standard, as previously explained.
Below is a table displaying various F series paper sizes:
Paper Format
Millimeters (mm)
Centimeters (cm)
Inches (in)
F0
841 x 1321
84.1 x 132.1
33.1 x 52
F1
660 x 841
66 x 84.1
26 x 33.1
F2
420 x 660
42 x 66
16.5 x 26
F3
330 x 420
33 x 42
13 x 16.5
F4
210 x 330
21 x 33
8.3 x 13
F5
165 x 210
16.5 x 21
6.5 x 8.3
F6
105 x 165
10.5 x 16.5
4.1 x 6.5
F7
82 x 105
8.2 x 10.5
3.2 x 4.1
F8
52 x 82
5.2 x 8.2
2 x 3.2
F9
41 x 52
4.1 x 5.2
1.6 x 2
F10
26 x 41
2.6 x 4.1
1 x 1.6
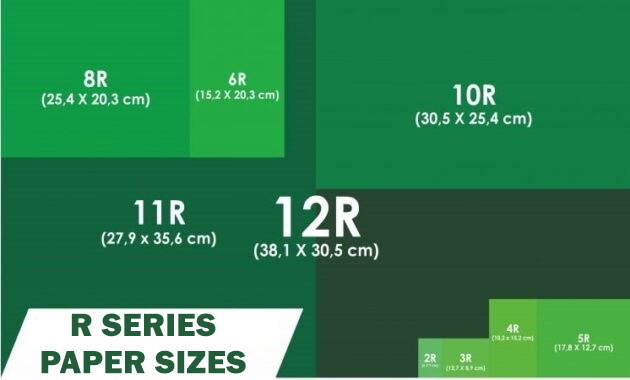
R Series Paper Sizes
r series paper sizes
R series paper is commonly used for printing photographs that are later placed in photo frames. Standard sizes that are frequently used include 4R, 5R, 10R, and 12R.
There are various types of paper suitable for photo printing, such as glossy, inkjet, matte, and many others. In addition to the paper type, the choice of printer used to produce the prints can also impact the final output quality of the photos.
Below is a table displaying the different sizes of R series paper:
Paper Format
Millimeters (mm)
Centimeters (cm)
Inches (in)
2R
60 X 90
6 X 9
2.36 X 3.54
3R
89 x 127
8.9 x 12.7
3.5 x 5
4R
102 x 152
10.2 x 15.2
4 x 6
5R
127 x 178
12.7 x 17.8
5 x 7
6R
152 x 203
15.2 x 20.3
6 x 8
8R
203 x 254
20.3 x 25.4
8 x 10
10R
254 x 305
25.4 x 30.5
10 x 12
11R
279 x 356
27.9 x 35.6
11 x 14
12R
305x 381
30.5 x 38.1
12 x 15
14R
284 x 353
28.4 x 35.3
11.18 x 13.90
17R
305 x 405
30.5 x 40.5
12 x 15.59
19R
305 x 455
30.5 x 45.5
12 x 17.92
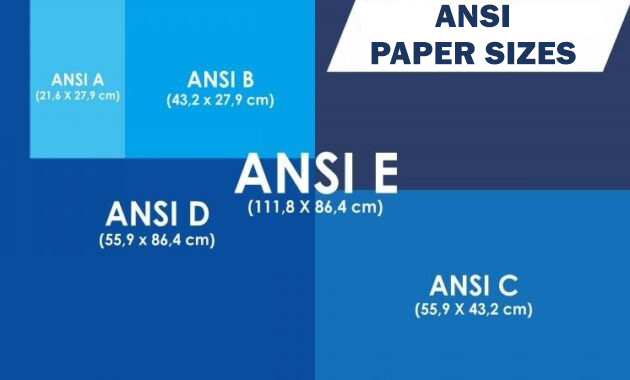
ANSI Paper Sizes
ansi paper sizes
The ANSI size standard refers to ANSI/ASME Y14.1, which defines paper dimensions based on the letter-size format commonly known as 8.5 x 11 inches.
In the table below, you will find the standard ANSI paper sizes measured in millimeters (mm), centimeters (cm), and inches (in):
Paper Format
Millimeters (mm)
Centimeters (cm)
Inches (in)
ANSI A
216 x 279
21.6 x 27.9
8.5 x 11
ANSI B
432 x 279
43.2 x 27.9
17 x 11
ANSI C
432 x 559
43.2 x 55.9
17 x 22
ANSI D
559 x 864
55.9 x 86.4
22 x 34
ANSI E
864 x 1118
86.4 x 111.8
34 x 44
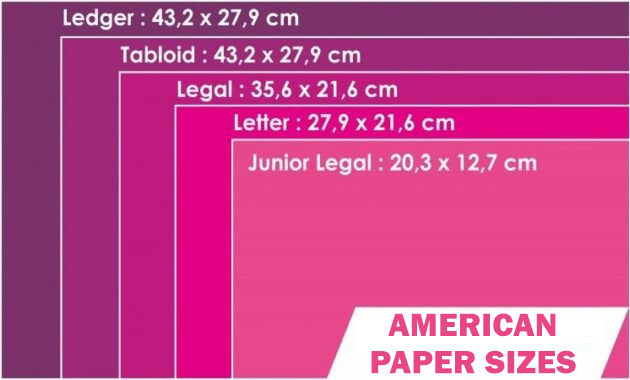
American Paper Sizes
american paper sizes
These paper sizes are commonly used by individuals living in North America and Mexico in their daily activities.
Below is a list of these paper sizes:
Paper Format
Millimeters (mm)
Centimeters (cm)
Inches (in)
Junior Legal
203 x 127
20.3 x 12.7
8 x 5
Legal
216 x 356
21.6 x 35.6
8.5 x 14
Letter
216 x 279
21.6 x 27.9
8.5 x 11
Tabloid
279 x 432
27.9 x 43.2
11 x 17
Ledger
432 x 279
43.2 x 27.9
17 x 11
HVS Paper Thickness
In addition to paper size, it’s also important to consider the thickness of HVS paper before using it. HVS paper comes in different thicknesses, and naturally, its applications vary according to those differences.
HVS paper thickness can generally be categorized into the following:
70 gsm: HVS paper with a thickness of 70 gsm is commonly used for photocopying or printing standard documents.
75 gsm: HVS paper at 75 gsm is typically used for printing and photocopying regular documents.
80 gsm: This thickness is suitable for printing important documents, such as office files or academic papers.
100 gsm: HVS paper with 100 gsm thickness is often used for presentations where detailed images and high print quality are required.
Commonly Used HVS Paper Sizes
As previously mentioned, HVS paper is widely used in offices, especially in large-scale business environments. This paper has a slightly rough texture, which helps ink from printers absorb more effectively.
HVS paper comes in various sizes tailored to different needs. The most commonly used sizes in Indonesia range from A5, B5, A4, Letter (Q4), Folio (F4), to A3, all of which are widely available at stationery and office supply stores.
For further reference, below is a table listing the most commonly used HVS paper sizes:
General HVS Paper Size Chart
Paper Size Name
Centimeters
Inches
A5
14.8 x 21
5 5⁄6 × 8 1⁄4
B5
18.2 x 25.7
7 1⁄6 × 10 1⁄8
A4
21 x 29.7
8 1⁄4 × 11 17⁄24
Letter (Quarto)
21.6 x 27.9
8 1⁄2 × 11
F4 (Folio)
21 x 33
8 1⁄4 × 13
A3
29.7 x 42
11 17⁄24 × 16 13⁄24
Please note: In Microsoft Office, the Legal size is different from Folio. The Legal size measures 21.6 cm x 35.6 cm. If you want to use Folio paper, it is recommended to select the custom size option in Microsoft Office.
Below are several types of HVS (Houtvrij Schrijfpapier) paper sizes that are commonly available across.
1. A5 HVS Paper
A5 paper generally has three different size measurements: in millimeters (145 x 210), centimeters (14.8 x 21.0), and inches (5.83 x 8.27). While these sizes may appear similar at first glance, the differences become quite noticeable when designing using software like CorelDRAW or Adobe Illustrator.
A5 paper is commonly used in various office settings and serves multiple purposes. Due to its relatively small size, A5 paper is ideal for creating restaurant or café menus, party invitations, as well as brochures or flyers. In the book publishing world, A5 paper is also used to print novels, short stories, and other literary works. However, in some cases, yellow A5 paper is preferred over white paper as it tends to be easier on the eyes when reading.
2. A4 HVS Paper
Compared to A5, A4 paper is far more commonly used in offices. A4 paper typically comes in three different size measurements: in millimeters (210 x 297), centimeters (21.0 x 29.7), and inches (8.27 x 11.69). Aside from HVS, other types of A4 paper include buffalo, folio, quarto, plano, and even polaroid paper.
Although many types of A4 paper are available, HVS remains the most affordable in terms of price. A4 paper serves a wide variety of purposes, including printing documents, writing office assignments, creating schedules, sketching drafts, and more.
Due to its high versatility, the use of A4 paper is not limited to office environments. It is also widely used in schools, universities, and various other institutions.
3. A3 HVS Paper
A3 HVS paper typically has a relatively thin texture, with a thickness ranging from 60 to 100 gsm. In many offices, this paper is used for creating work reports, as a medium for printing flyers, and also for drawing purposes, although its use for drawing is less common.
A3 paper comes in three size formats: in millimeters (297 x 420), centimeters (29.7 x 42.0), and inches (11.69 x 16.54). Aside from HVS, A3 paper is also available in other types such as art paper, chromo sticker, linen, fancy, and ivory.
Compared to A4 and A5 paper, A3 is significantly larger and therefore less commonly used. It is mostly utilized by civil engineering and architecture students for building design assignments.
4. A2 HVS Paper
In terms of size, A2 paper is smaller than A1 and A0. However, its use is relatively rare when compared to A4 and A5 paper, especially in office environments. Typically, A2 paper is used for printing large-sized photos, posters, or maps, and is rarely used for other purposes.
In the market, aside from HVS, A2 paper also comes in ivory and duplex types. All three share the same dimensions: in millimeters (420 x 594), centimeters (42.0 x 59.4), and inches (16.54 x 23.39).
Before purchasing, it’s important to ensure the paper is still sealed (new stock) to maintain its ink absorption quality when used with printing machines.
5. A6 HVS Paper
Although small in size, A6 paper still has many practical uses. You can use it for creating shopping notes, jotting down ideas from brainstorming sessions, or making small flyers. Additionally, this paper is great for writing memos with special messages. For example, if you’re assigned a task that requires you to travel out of town while no other staff are present in the office.
Even though A6 and A2 HVS paper are rarely used, it is still advisable to keep a supply at the office. They may come in handy when the need arises unexpectedly.
Conclusion
By now, you likely have a better understanding of HVS paper sizes, their types, and their various applications. When choosing HVS paper for your work, make sure to consider the type and size that best suit your needs. HVS paper is an excellent choice for a wide range of purposes thanks to its high quality and versatility. We hope this information helps you better understand the ins and outs of HVS paper. See you in the next article!
Apex Weather is a reliable weather forecast app that provides accurate daily reports and real-time forecasts. With this app, you can view the temperature and weather conditions for each hour of the day, ensuring you’re always prepared, whether that means bringing an umbrella or dressing for the heat.
From the main screen, you can easily view the current temperature, along with today’s and tomorrow’s high and low temperatures. The app also displays key details such as humidity levels, wind speed, atmospheric pressure, and hourly temperature updates.
One of Apex Weather’s standout features is its customizable widget, which lets you access essential weather information directly from your home screen. You can adjust the size and content of the widget to suit your preferences and needs.
Overall, Apex Weather is an exceptional app that delivers fast, accurate weather information through a clean and user-friendly interface. Whether you need a quick glance or a detailed report, this app has you covered.
Apex Weather
1 of 7
apex weather
————Features————
Realtime local temperature checker & live local weather
This clock weather app displays weather temperature based on your current location. You can also add more cities to your city list, so that you can check global weather anytime.
Hourly forecasts
Before you go out, you can check this free weather app to get prepared for unexpected weather changes. In addition, you can also check hourly temperature and rain probability to plan your outdoor activities.
Daily weather
Besides, you can also check today&tomorrow forecasts (7 day weather forecasts) with this temperature app. With this accurate weather report app, you won’t get caught in the rain again!
Severe weather alerts
This climate app can also turn into a global weather tracker and it can send you severe weather alerts to help you get prepared for upcoming weather changes, like thunder, heat wave, thunderstorm, heavy rainfall and so on.
So in another word, you can see it as a rain app of minute-level precision, as it can inform you these severe weather and sudden temperature change ahead of time.
This weather pro app is packed with different weather themes and temperature clock widgets to decorate your home screen. In addition, these weather widgets for android also display radar information like accurate outside temperature, forecasts, sunrise time and sunset time, humidity, air pressure, wave, UV, and cloud info.
Meanwhile, these weather clock widgets come in different styles and themes, like battery widget, digital clock weather and transparent weather widgets. You’ll definitely find one you love!
Detailed weather updates
In this daily and hourly weather app, you can get more than just temperatures and clock. You can check humidity, visibility, UV index, air pressure, wind speed, sunrise time, sunset time in different units.
Global weather coverage
You can check world weather very easily.
Weather news
This world weather app is not just about weather. In this temperature checker, you can get the latest news covering society, entertainment and sports.
Daily weather updates brief
Users can choose to receive daily weather updates brief report in the morning and evening to check weather today and weather tomorrow.
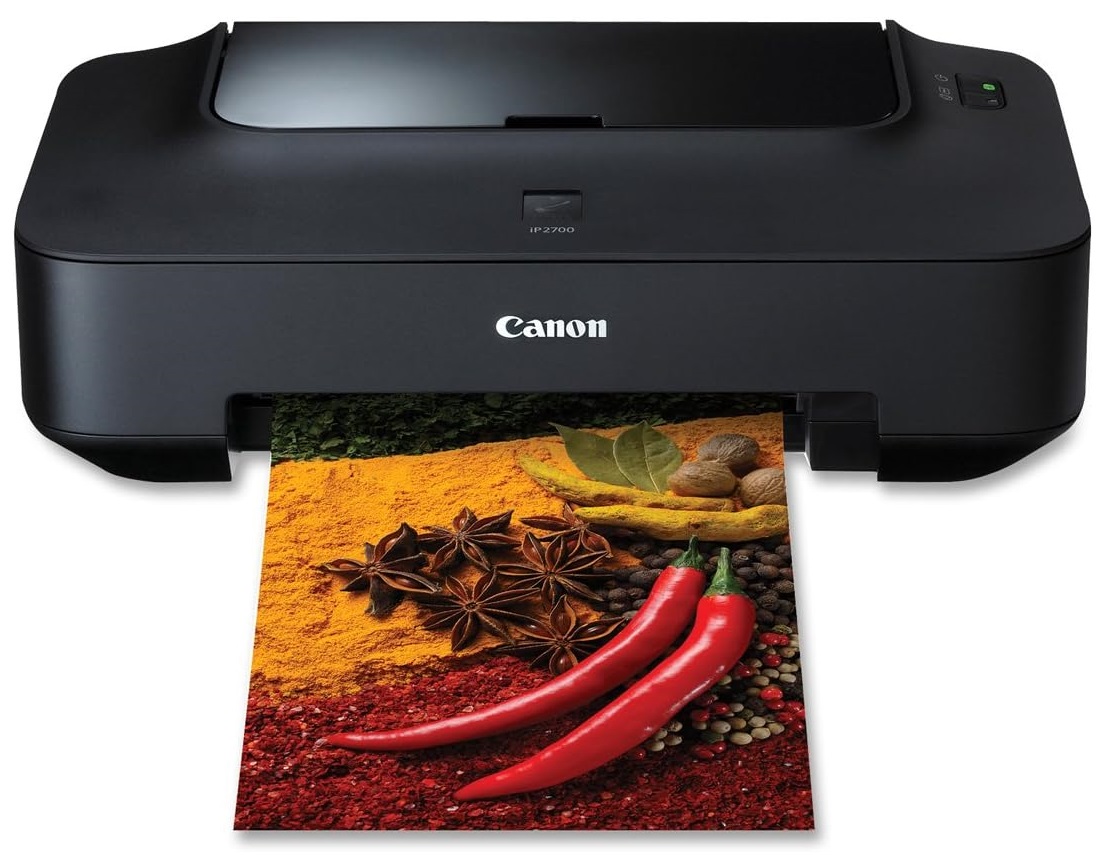
When it comes to photo printing, inkjet printers like the Canon iP2770 are generally preferred over most laser printers. Inkjet printers use nozzles to create images from a multitude of tiny ink droplets, allowing for sharper details and a wider range of colors.
The clarity of color and detail in your photos can be further enhanced by using high-quality media such as glossy photo paper or other premium paper types. Ink quality also plays a significant role in the overall photo output, as does the print resolution you select. The Canon iP2770 supports a resolution of up to 4800 x 1200 dpi, enabling you to print eye-catching, high-quality photos.
Therefore, in order to use the printer properly, you will need the Canon iP2770 printer driver, which will be provided in this article.
Canon iP2770 Features
Canon iP2770 Printer
The print speed of the Canon iP2770 was measured using 4 Word documents, 4 PDF documents, and 4 Excel documents. An additional 30 seconds was added to account for the processing of several extra documents. All prints were performed on A4 plain paper. The test results showed a print speed of 7 ipm for black-and-white printing and 4.8 ipm for color printing.
For photo printing, we used glossy photo paper (PP-201) with a 4 x 6 inch photo size. The printing was done in borderless mode. The test results indicated a print time of approximately 55 seconds.
Ink supply on the Canon iP2770 is managed through cartridges. To reduce the frequency of cartridge replacement, this printer features a slot that supports XL-sized cartridges. This advantage contributes to improved work efficiency, particularly in business environments, as it minimizes downtime due to cartridge changes.
To support high-volume printing, the Canon iP2770 is equipped with a paper tray that can hold up to 100 sheets of A4 plain paper. When using photo paper, the tray can accommodate up to 20 sheets.
It’s worth noting that this paper tray capacity has a positive impact on profit-oriented businesses. The larger the paper capacity, the less time is wasted refilling the tray.
This printer also has low power consumption—around 0.7 Watts in standby mode and 0.4 Watts when turned off. Additionally, the Canon iP2770 comes with a software called My Image Garden. This software provides a variety of photo printing options, such as creating collages in different styles, DVD label printing, photo enhancement, and sticker printing. Installing the software is optional. Although the file size is quite large around 294 MB, the features it offers are well worth it.
Latest Canon Pixma iP2770 Printer Driver
Supports Canon PIXMA iP2770 and iP2700 Printers
Compatible with Windows 10, Windows 8, and Windows 7
Available for both 64-bit and 32-bit operating systems
Very easy installation steps
Best integration with all applications
Seamless integration with browsers, MS Office, and PDF software
Connect the Canon iP2770 printer to your PC or laptop
Run the downloaded driver installer, then install as usual or choose “Run as Administrator”
In the following dialog, click the Next button
Choose America according to your area, then click Next
Click the Yes button
Wait until the printer and computer are connected
Once the installation is successful, a Successfully Installed screen will appear, click Complete
Enjoy!
Conclusion
From the summary above, it’s clear that the Canon iP2770 printer offers several features that enhance ease of use and improve printing efficiency. To manage data exchange with a computer, the printer uses a High-Speed USB 2.0 connection with fast data transfer rates. In addition, the Canon iP2770 driver is available for free download, allowing all users to always have access to the latest software that supports optimal printer functionality.
Aside from its technical features, the Canon iP2770 also stands out for its high-quality photo printing capabilities and ink efficiency through the use of XL-sized cartridges. Its large paper tray capacity also makes it well-suited for business environments that require high-volume printing.
Overall, the Canon iP2770 is a solid choice for users in need of a reliable printer with excellent print quality and a range of productivity-enhancing features.
Download Canon iP2770 Driver for Free
To facilitate data exchange between your computer and printer, the Canon iP2770 is equipped with a High-Speed USB 2.0 connection, which allows data transfer rates of up to 480 Mbps. In order to enable communication between the two devices, users can download the Canon iP2770 printer driver free of charge. For the latest version and a free download of the Canon iP2770 printer driver, please visit the link below:
Canon iP2770 Printer Driver for Windows
For Windows operating systems, this driver supports a wide range of versions, including Windows 11, Windows 10 32-bit, Windows 10 64-bit, Windows 8.1 32-bit, Windows 8.1 64-bit, Windows 8 32-bit, Windows 8 64-bit, Windows 7 32-bit, Windows 7 64-bit, Windows Vista 32-bit, Windows Vista 64-bit, Windows XP 32-bit, and Windows XP 64-bit.
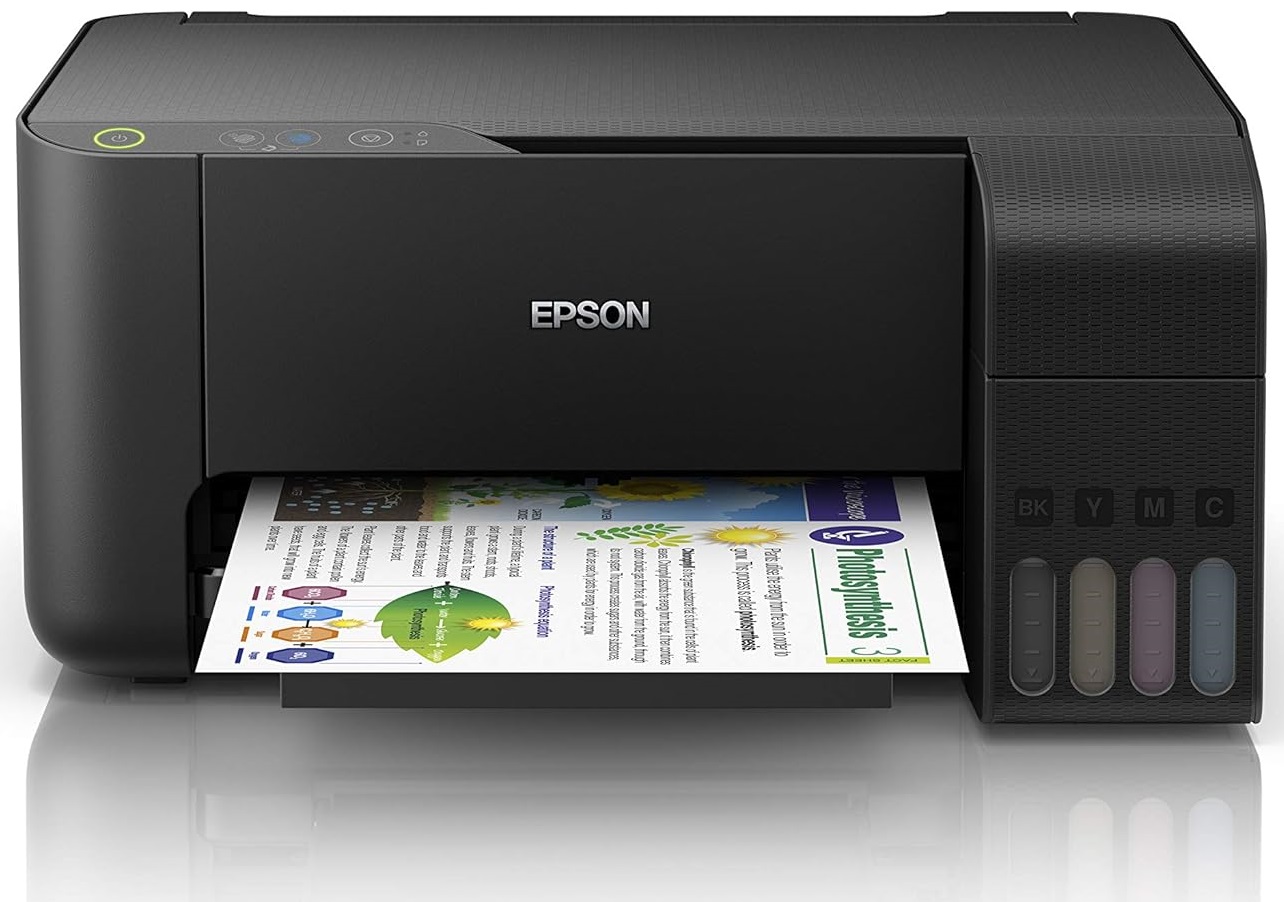
The desire of printer users in Indonesia to reduce high ink costs has led to the creation of a smart innovation known as the ink infusion system. This innovation was later adopted by Epson, resulting in advanced printer products with a similar but more simplified ink refill system. This system is also featured in the Epson L3110 printer.
Unlike some earlier printer models that placed the ink tank on the side of the body, this printer has its ink tank positioned at the front. This design offers a clear advantage, as it makes refilling the ink tank easier, especially for printers placed close to walls.
Advantages of the Epson L3110 Printer
Epson L3110 Printer
One of the main strengths of the Epson L3110 is its integration of three essential functions printing, scanning, and copying into a single device. This makes it more cost-effective than buying three separate machines. Additionally, it is easier and more economical to maintain since you only need to take care of one unit.
As a printer, managing all aspects related to ink is less troublesome compared to cartridge-based printers. The large-capacity ink tank ensures that ink does not run out quickly, so refilling isn’t required as often. This means your workflow won’t be disrupted frequently by the need to replace ink.
Borderless Photo Printing
The Epson L3110 is capable of borderless photo printing up to 4R size, meaning there are no white margins around the edges of the paper as in standard printing modes. As a result, you no longer need to trim the edges—saving you time, especially when printing a large number of photos.
The printing technology implemented in the Epson L3110 allows it to produce 10 cm x 15 cm (4 x 6 inch) borderless photos in about 90 seconds. In comparison, the same photo printed in standard mode takes about 69 seconds.
This is made possible through bi-directional printing, piezoelectric technology, and the number of nozzles on the print head. Document printing speed is even higher when the content consists of text only. For greater efficiency, you can activate the “draft” mode when printing text pages that do not require high print quality.
In addition to speeding up text document printing, the “draft” mode also helps reduce ink consumption, ultimately saving you money.
The installation process for the Epson L3110 driver is not much different from installing most other software applications. However, to help avoid any confusion, here is a brief step-by-step guide:
First, download the driver installation file from the link above. Make sure your printer is powered on and connected to your computer.
Once the download is complete, right-click the downloaded driver file and select “Run as administrator.”
Next, check the box labeled “Set as default printer” and click OK.
When the “Epson EULA” dialog box appears, select “Agree” and click OK.
Wait for the installation process to complete.
If a notification appears confirming that the installation was successful, click OK.
After completing these steps, the driver will be successfully installed, and your Epson L3110 printer will be ready to use. To ensure the driver functions properly, it’s recommended to restart your computer before starting any print jobs.
Conclusion
In this article, we’ve thoroughly discussed the Epson L3110 printer driver. This driver is a vital component that enables communication between your printer and computer, allowing smooth printing operations. Installing the Epson L3110 driver is a straightforward process, similar to installing any regular application.
The steps include downloading the driver installation file, running it as an administrator, setting the printer as default, agreeing to the terms of use, and waiting for the installation to complete. Once installed, your Epson L3110 is ready for use.
This driver allows you to utilize the advanced features of the Epson L3110 printer, including borderless printing and optimal print speeds. Make sure to install the driver correctly and restart your computer before printing to ensure the best performance. With the right driver, you can enjoy high-quality prints and efficient ink usage.
Download the Latest Epson L3110 Driver
Ink efficiency is not the only reason why many people choose the Epson L3110 printer. In addition to its affordable price, the warranty it offers is also a significant advantage.
For up to two years, or as long as the total number of printed pages remains under 30,000, you can continue to benefit from the warranty. Even if the print head gets damaged, it is one of the printer components that will be replaced as long as the warranty is still valid. You can download the latest and free Epson L3110 printer driver through the link below:
Epson L3110 Printer Driver for Windows
The driver supports a wide range of Windows operating systems, including Windows 11, Windows 10 32-bit, Windows 10 64-bit, Windows 8.1 32-bit, Windows 8.1 64-bit, Windows 8 32-bit, Windows 8 64-bit, Windows 7 32-bit, Windows 7 64-bit, Windows Vista 32-bit, Windows Vista 64-bit, Windows XP 32-bit, and Windows XP 64-bit.
For macOS, it supports Mac OS X 10.14 Mojave, Mac OS X 10.13 High Sierra, Mac OS X 10.12 Sierra, Mac OS X 10.11 El Capitan, Mac OS X 10.10 Yosemite, Mac OS X 10.9 Mavericks, Mac OS X 10.8 Mountain Lion, Mac OS X 10.7 Lion, Mac OS X 10.6 Snow Leopard, and Mac OS X 10.5 Leopard.
For Linux systems, the driver supports both 32-bit and 64-bit operating systems and is available in both .deb and .rpm packages. You can download the printer driver here and the scanner driver here.
Hello to all workers and students wherever you are, in this post, I will share an article about the Epson L3210 printer driver and how to install it. A printer is a device that can help you complete various tasks, especially if you work in an institution or office. The presence of a printer plays an important role in increasing the efficiency and speed of completing different documents.
By using a printer, you can easily print multiple documents directly. Moreover, there are now many cost-efficient printers available that still offer optimal functionality.
Unlike in the past, hardware like printers has become commonplace among students. Printers are now considered essential devices for learners due to their frequent use in academic activities, especially for printing documents or hard copies.
Therefore, it’s no longer surprising that people from all walks of life use printers. There are various types of printers available that you can choose from depending on your needs and intended use.
For that reason, we would like to recommend one printer that is highly suitable for those of you who frequently use printers in your daily activities.
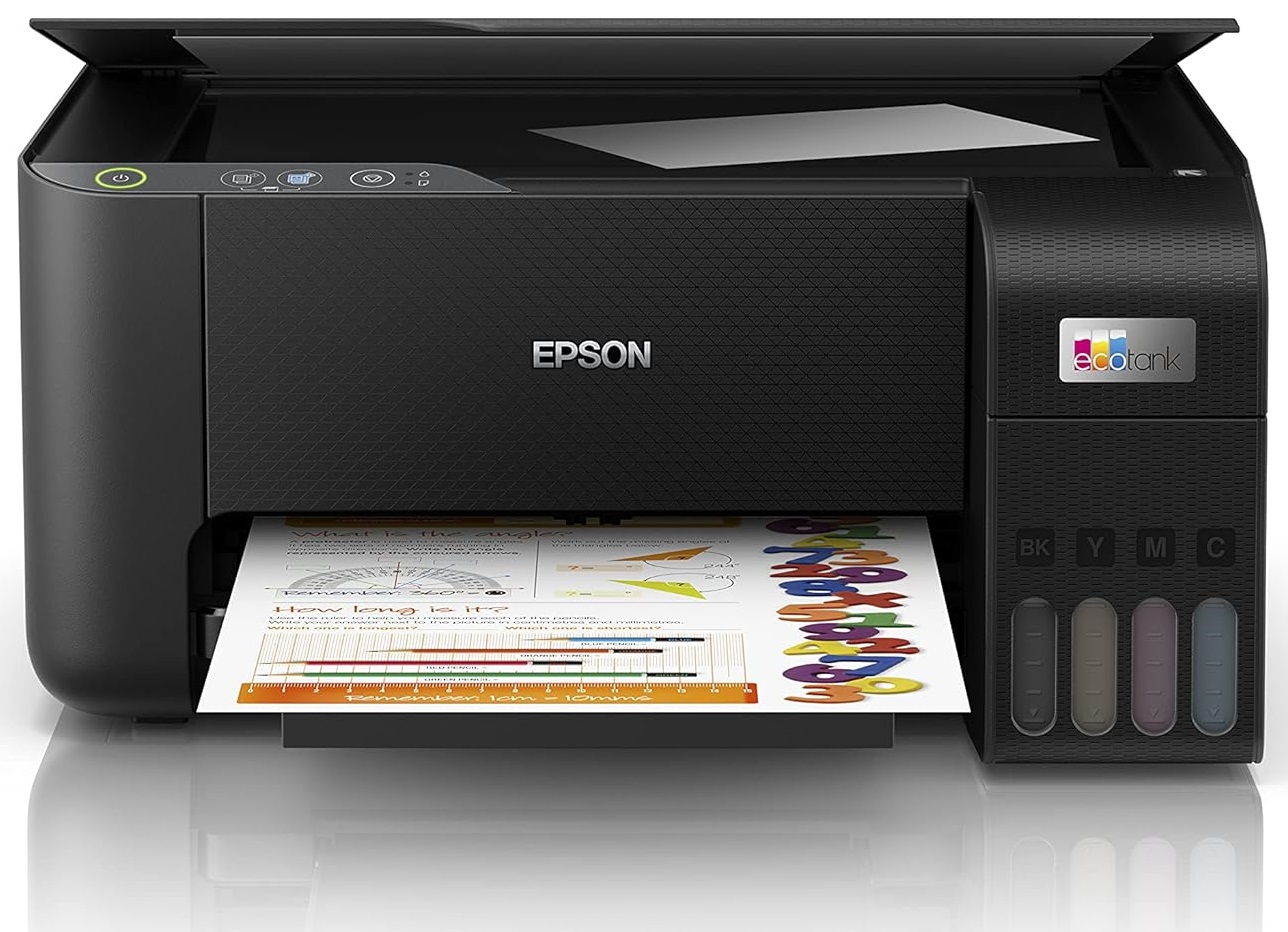
Features & Advantages of the Epson L3210
Epson L3210 Printer
The Epson L3210 is a multifunction printer that is well-suited for both office workers and students. With this printer, you can easily produce a variety of documents according to your needs. Another major advantage of the Epson L3210 is its scanning capability, which allows you to easily digitize your physical documents.
The Epson L3210 comes equipped with a wide range of excellent features that are particularly useful for users with heavy document-related workloads. By using the Epson L3210, you can easily multitask throughout the document creation process.
Below are several functions and other appealing features offered by the Epson L3210 printer:
Scan: You can effortlessly convert physical documents into digital files using the built-in scanning feature, eliminating the need for a separate scanner.
Copy: For students, the Epson L3210 allows you to make photocopies at home—much more cost-effective than purchasing a standalone copy machine.
Inkjet Ink: You don’t have to worry about frequently changing ink cartridges. With the Epson L3210, you can easily monitor ink levels and refill them using external ink tanks.
High Resolution: The Epson L3210 can print high-quality documents—including text and images—at a resolution of up to 5760 x 1440 dpi.
Print Speed: This printer is highly reliable for fast printing. It only takes around 4–6 seconds per page to print text documents, allowing you to produce sharp printouts quickly.
With this single hardware device, you can print, scan, and copy documents with ease. It enables you to complete multiple tasks efficiently when working on documents. Some additional noteworthy features of the Epson L3210 include:
Minimalist and Spill-Free Design
This printer features a sleek design with an integrated ink tank system, which saves space. Its specially designed ink bottles with nozzles also help prevent spills and refilling errors.
Excellent Print Quality and Speed
The Epson EcoTank L3210 can print at speeds of up to 10.0 ipm for black-and-white documents and 5.0 ipm for color documents, which significantly improves productivity. It also supports borderless photo printing up to 4R size.
Ink-Efficient with High-Quality Output
Even though original Epson ink can be costly, the EcoTank L3210 helps reduce printing expenses while delivering outstanding print results. Each set of ink bottles can yield up to 4,500 pages in black and 7,500 pages in color.
Long Warranty Period
Epson offers a generous warranty on its printer products, including the Epson L3210. Each new printer purchase is backed by up to 2 years or 30,000 pages whichever comes first.
Scanning and Copying Support
As an all-in-one printer, the Epson L3210 makes it easy for users to scan and copy documents. This allows you to significantly cut costs while enjoying the convenience of multifunctionality in a single device.
The Epson L3210 printer offers excellent compatibility with various operating systems, including Windows, Mac, and Linux.
Its minimalist design ensures it doesn’t take up much space in your workspace. Below are the general specifications of the Epson L3210 printer:
General Specifications
Printer Model
Epson L3210
Printer Type
Inkjet Printer
Printer Features
Multifunction (Print, Scan, Copy)
Operating Systems
Windows, Linux, Mac
Technology
On-Demand InkJet (Piezoelectric)
Ink-Saving Mode
Yes
Connectivity
Hi-Speed USB 2.0
Print Resolution
5760 x 1440 dpi
Default Photo
Size 10 x 15 cm / 4 x 6 inch
Photo Print Speed
With border: 69 seconds per photo. Borderless: 90 seconds per photo
Document Print Speed
10 seconds (Black) / 16 seconds (Color)
Scan Resolution
600 x 1200 dpi
Flatbed Scan at 200 dpi
11 seconds (Black) / 32 seconds (Color)
Copy Resolution
600 x 600 dpi
Maximum Copies
Up to 20 pages
Automatic Duplex Printing
Not supported
Printer Dimensions
37.5 x 34.7 x 17.9 cm (Length x Width x Height)
Weight
3.9 kg
Official Warranty
2 years / 30,000 pages (whichever comes first)
How to Install the Epson L3210 Printer Driver
After successfully downloading the 32-bit or 64-bit version of the Epson L3210 printer driver according to your operating system, the next step is to install it on your device.
The driver installation process is quite simple and similar to installing other Epson drivers. However, to ensure you don’t get confused, we’ve provided a brief step-by-step guide below:
First, turn on the Epson L3210 printer and connect the printer cable to your PC or laptop.
Then, right-click on the driver file you downloaded and select the “Run as administrator” option.
Next, check the box for “Set as default printer” in the “Epson Printer Utility Setup” dialog box, then click “OK.”
Choose the language “English” and click “OK.”
After that, select “Agree” in the “Epson EULA” dialog box and click “OK.”
The printer driver installation process will begin. Wait until it is completed.
Once the process is complete, you will receive a notification that the driver has been successfully installed. Click “OK.”
Your PC or laptop has now successfully installed the Epson L3210 printer. You can access all supporting features, including the Epson L3210 printer cleaning function.
Conclusion
To sum up, installing the Epson L3210 printer driver is a simple but essential step to ensure your printer operates properly on your device. In this article, we’ve provided a clear and easy-to-follow step-by-step guide to help you install the driver. Now, you can easily access and take advantage of all the supporting features of the Epson L3210, including its efficient printer cleaning function. We hope this article is helpful, don’t forget to share it with others!
Download the Latest Epson L3210 Printer Driver
The Epson L3210 comes equipped with three main functions: scanning, printing, and copying. With these useful features, you can save costs that would otherwise be spent on purchasing separate hardware. With just one printer device, you get three major benefits.
However, it’s important to remember that every Epson printer requires a specific driver to function optimally. If you need the driver for the Epson L3210 printer, you can download the latest version for free using the link below:
Epson L3210 Printer Driver for Windows
The Windows driver supports a wide range of operating system versions, including Windows 11, Windows 10 (32-bit), Windows 10 (64-bit), Windows 8.1 (32-bit), Windows 8.1 (64-bit), Windows 8 (32-bit), Windows 8 (64-bit), Windows 7 (32-bit), Windows 7 (64-bit), Windows XP (32-bit), and Windows XP (64-bit).
Drivers and Utilities Combo Package Installer for windows
The macOS driver also supports many OS versions, including Mac OS X 14 Sonoma, Mac OS X 13 Ventura, Mac OS X 12 Monterey, Mac OS X 11 Big Sur, Mac OS X 10.15 Catalina, Mac OS X 10.14 Mojave, Mac OS X 10.13 High Sierra, Mac OS X 10.12 Sierra, Mac OS X 10.11 El Capitan, Mac OS X 10.10 Yosemite, Mac OS X 10.9 Mavericks, Mac OS X 10.8 Mountain Lion, Mac OS X 10.7 Lion, and Mac OS X 10.6 Snow Leopard.
Drivers and Utilities Combo Package Installer for Mac
Hello to all workers and students wherever you are, in this article, Rekber Network will share information about the Epson L120 printer driver, which is likely being searched for by many people. Before we get to the download link, let’s take a quick look at the Epson L120 itself.
Before Epson introduced its ink tank system, many printer users in Indonesia had already switched to third-party ink tanks. The reason was simple using ink tanks was much more economical compared to using cartridges.
Seeing how their ink business was affected by the rise of third-party ink tank systems, Epson didn’t stay silent. This leading company began designing several printer models equipped with their own built-in ink tanks. These types of printers later became known as EcoTank printers.
With the positive response to their initial products used to test the market, Epson then started launching various printer models featuring the same ink tank system.
In Indonesia, the Epson L120 is one of the most popular printers. It falls into the mid-range class and is widely used in schools, homes, and offices. Moreover, it is also commonly used by university students.
Advantages of the Epson L120 Printer
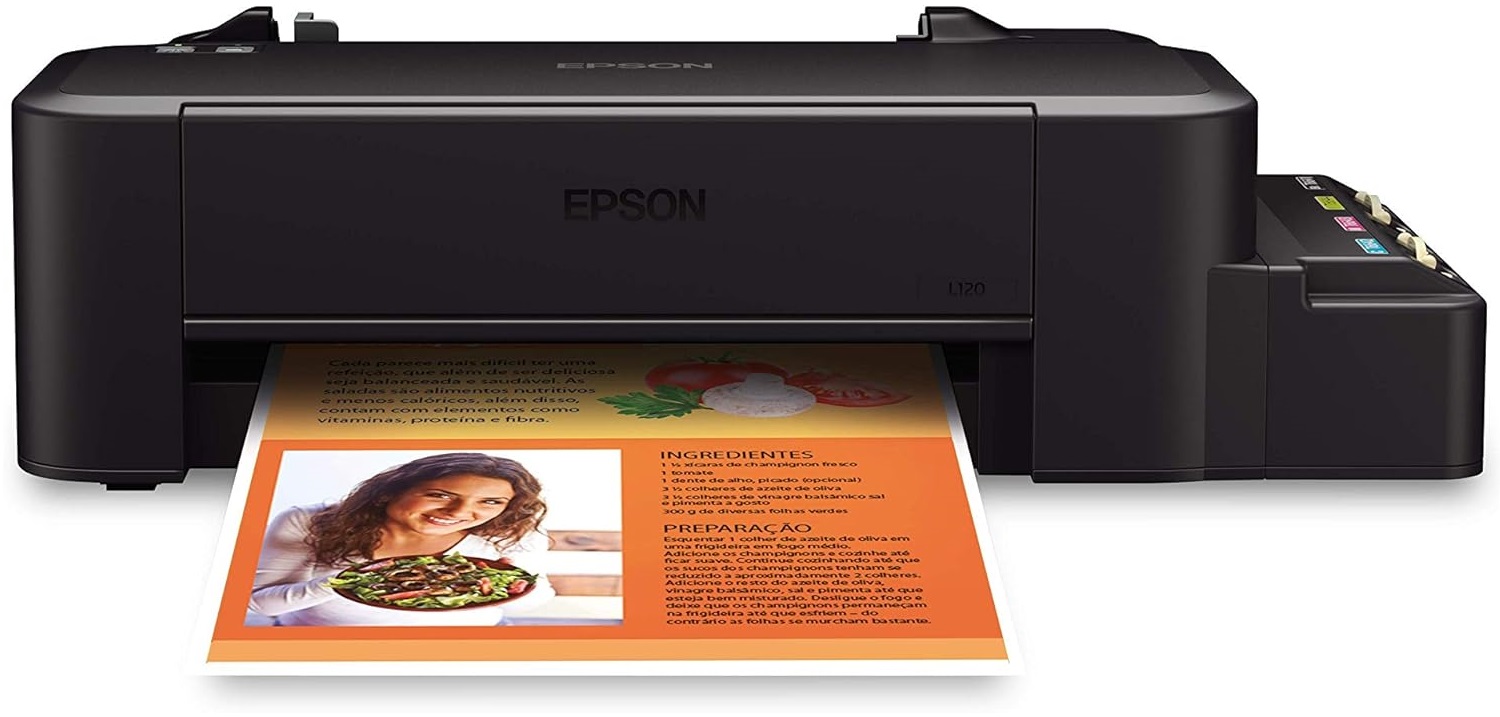
Epson L120 Printer
The Epson L120 is one of the standout printers in the EcoTank series. This printer comes with four ink bottles for both black-and-white and color printing each with a capacity of 40 ml. The black ink bottle can print up to 4,500 pages, while the three color ink bottles can produce up to 7,500 pages.
However, it’s important to note that the number of pages printed may vary depending on several factors. These include the type of documents being printed, the kind of paper used as a printing medium, and the room temperature.
The ink used is genuine Epson ink. If you use third-party ink, the difference in print yield may be more significant. More importantly, using non-genuine ink carries a higher risk of damaging your printer. Even a difference in ink acidity (pH level) can cause problems with your device.
In terms of print quality, the Epson L120 printer uses Micro Piezo technology in its printhead, which can print up to 720 dots per inch (dpi) using hundreds of nozzles distributed across the printhead. According to the ISO/IEC 24734 standard, its print speed is approximately 8.5 black-and-white pages per minute and 4.5 color pages per minute.
Here are some of the key advantages of the Epson L120 printer:
The Epson L120 has a compact size of approximately 461 x 215 x 130 mm and weighs only 2.4 kg, making it ideal for small spaces.
It offers high printing speeds—8.5 IPM (Images Per Minute) for black-and-white and 4.5 IPM for color prints.
Another major advantage is its ink efficiency and easy refill system.
It comes with a long warranty period of up to two years.
The Epson L120 driver can be installed on Windows operating systems, including Windows 7, Windows 8, Windows 8.1, Windows 10, and Windows 11. This driver is available in both 32-bit and 64-bit versions. Below are the steps to install the driver:
First, download the Epson L120 Printer Driver file from the link above, based on the version you need, either 32-bit or 64-bit.
Turn on your printer and connect the USB cable to your device/computer.
Once the download is complete, open the driver installer. Check the options “Set as default printer” and “Automatically update software” if needed, then click OK.
Select your preferred language, then click OK.
Accept the license agreement by checking the “Agree” box. Click OK.
The installation process will begin, and you will be prompted to turn on the printer and connect it to your computer.
Once the installation is complete, you will see a message stating, “Driver installation was completed successfully,” indicating that the printer is ready to use.
Conclusion
Overall, the Epson L120 printer driver is an essential component to ensure that your printer functions properly across various Windows operating systems. This article has provided a step-by-step guide on how to download, install, and configure the Epson L120 driver. It supports multiple versions of Windows from Windows 7 to Windows 11 and is available in both 32-bit and 64-bit versions.
In addition, this article emphasizes the importance of using original Epson ink to maintain your printer’s performance and print quality. Besides reducing printing costs, genuine ink helps minimize the risk of printer damage caused by pH imbalances in non-original inks.
For everyday use, Epson L120 users are also given guidance on using manual duplex printing and on how to reduce power consumption when the printer is not in use.
By following this guide, you can easily install and optimize your Epson L120 printer driver, allowing you to print documents efficiently and with high quality. See you in the next article, and don’t forget to share, thank you!
Download the Latest Epson L120 Printer Driver
The Epson L120 printer is equipped with duplex printing capability, though it requires manual operation. This means that after the printer prints on one side of the paper, you’ll need to manually flip the sheet to print on the other side.
Once you’re finished using the Epson L120 printer which weighs less than 3 kg, you can switch it to Sleep Mode to reduce power consumption to only 0.6 Watts. If the printer will not be in use for an extended period, it is advisable to turn it off completely.
To power off the Epson L120 printer, use the power button provided on the device, do not unplug the power cable directly from the wall socket. You can download the latest Epson L120 driver for free via the link below:
Epson L120 Printer Driver for Windows
The Windows driver supports a wide range of operating system versions, including Windows 11, Windows 10 (32-bit), Windows 10 (64-bit), Windows 8.1 (32-bit), Windows 8.1 (64-bit), Windows 8 (32-bit), Windows 8 (64-bit), Windows 7 (32-bit), Windows 7 (64-bit), Windows XP (32-bit), and Windows XP (64-bit).
The macOS driver also supports many OS versions, including Mac OS X 12 Monterey, Mac OS X 11 Big Sur, Mac OS X 10.15 Catalina, Mac OS X 10.14 Mojave, Mac OS X 10.13 High Sierra, Mac OS X 10.12 Sierra, Mac OS X 10.11 El Capitan, Mac OS X 10.10 Yosemite, Mac OS X 10.9 Mavericks, Mac OS X 10.8 Mountain Lion, Mac OS X 10.7 Lion, Mac OS X 10.6 Snow Leopard, and Mac OS X 10.5 Leopard
Hello to all office workers and students wherever you are, this time Rekber Network would like to share a highly searched article the Epson L121 printer driver. Before we get to the download link, let’s take a quick look at the Epson L121.
Epson is a leading printer brand known as a pioneer of the Ink Tank feature, which allows you to easily refill ink without having to inject it into a cartridge. This feature helps reduce the chances of errors during the refilling process.
Epson is well-known for its durability and excellent quality. The company has introduced its latest innovation: printers with an integrated Ink Tank system, making it easy for users to refill their printer ink.
One of the improved models in their product lineup is the Epson L121 series. This printer offers superior print quality compared to its predecessor, while also reducing maintenance costs.
As a result, this series is ideal for both remote workers and students. Its ability to print up to 100 sheets in a single print job enhances productivity when completing tasks.
Epson L121 Printer Features
Epson L121 Printer
The Epson L121 is the successor to the discontinued Epson L120. As an upgraded model, it naturally comes with better quality than the previous generation.
This printer is also supported by EcoTank technology, which helps significantly reduce ink usage. Its affordable price places it in the category of budget-friendly printers.
In addition, the Epson L121 features Epson Micro Piezo technology, which is integrated directly into the printhead cartridge, resulting in sharper print quality. Its compact body also allows it to be placed elegantly in small spaces with a minimalist look.
That’s not all the Epson L121 also offers several attractive features, such as:
1. Spill-Free Ink Design
Like other L-series models, the Epson L121 has an EcoTank system with integrated ink tanks, which helps prevent spills and saves space.
2. Epson Heat-Free Technology
Another noteworthy feature is its heat-free printing technology, which helps reduce excessive heat during the printing process.
3. Print Speed
The Epson L121 has a relatively fast print speed for its class, capable of printing black-and-white text documents in about 10 seconds and color documents in 15 seconds.
4. Ink Efficiency
Despite its speed, the Epson L121 is ink-efficient. One full set of ink can print up to 4,500 black-and-white pages and 7,500 color pages.
5. 2-Year Warranty
Epson provides a long warranty period—2 years, which is longer than the majority of printer manufacturers that typically offer only a 1-year warranty.
The process of installing the Epson L121 printer driver is actually not much different from installing other printer drivers in general. However, to avoid any errors during installation, you can follow the steps below carefully.
Here are the steps to install the Epson L121 printer without using a CD and free of charge:
First, right-click the downloaded driver file, then select ‘Run as administrator‘ and click ‘Yes‘.
Next, check the ‘Set as default printer‘ option and click ‘OK‘.
Then, change the language to ‘English‘ and click ‘OK‘.
A dialog box titled ‘Epson EULA‘ will appear. Choose ‘Agree’ and click ‘OK‘.
The installation process will begin. Wait until the port configuration process is complete.
Once the installation is successful, a notification will appear. Select ‘OK‘.
Testing the Epson L121 Printer Functionality
You can optimize the performance of your Epson L121 printer. However, before proceeding, it is recommended to restart your PC or laptop to ensure that the downloaded Epson L121 driver functions optimally.
To verify that the driver is working properly, you can perform a test print. This can be done by printing documents using various settings, both in monochrome and color modes.
If everything runs smoothly, it indicates that the Epson L121 driver installation was successful.
How to Print Using the Epson L121
Here are the steps for printing with the Epson L121:
Make sure the Epson L121 driver is properly installed on the computer or laptop.
Check the USB cable connection between the printer and computer.
Turn on the printer.
Prepare and load paper into the paper tray.
Open the file you want to print, such as a Microsoft Word document.
Press Ctrl + P on your keyboard to open the print window.
In the “Printer” section, select the printer model. If Epson L121 is not listed, you may select Epson L120 as an alternative.
Click “OK” to start printing the document.
Conclusion
In this article, Rekber Network has reviewed Epson printers, specifically the Epson L121, which is known as a pioneer of the Ink Tank feature. We also discussed the brand’s strengths in terms of durability and exceptional print quality. As the successor of the L120, the Epson L121 offers improved print quality, efficient EcoTank technology, and several advanced features.
However, to fully utilize the Epson L121, it’s essential to install the correct driver. This article provides a step-by-step guide on how to download and install the Epson L121 driver for both Windows and macOS systems. We also highlighted the importance of testing the printer’s functions after completing the driver installation.
With the correct Epson L121 printer driver, you can optimize its performance to produce high-quality documents. The Epson L121 is an affordable and efficient choice for a variety of printing needs. That concludes this article from Rekber Network, we hope it helps you resolve any issues with your Epson L121 printer. See you in the next article!
Download the Latest Epson L121 Driver
The Epson L121 comes equipped with Epson’s Micro Piezo technology integrated into the print head, allowing it to produce high-quality printed images. With these impressive features, you can save money that would otherwise be spent on additional hardware needed to achieve high-resolution print quality.
However, it’s important to remember that every Epson printer requires the appropriate dedicated driver to operate optimally based on its specific model. If you need the driver for the Epson L121, you can easily download it for free via the link provided below:
Epson L121 Driver for Windows
Windows supports a wide range of operating system versions, including Windows 11 (32/64-bit), Windows 10 (32/64-bit), Windows 8.1 (32/64-bit), Windows 8 (32/64-bit), Windows 7 SP1 (32/64-bit), Windows Vista SP2 (32/64-bit), Windows XP SP3 (32bit), Windows 2000 SP4, Windows Server 2016, Windows Server 2012 R2, Windows Server 2012, Windows Server 2008 R2 SP1, dan Windows Server 2008 SP2 (32/64bit).
macOS versions supported include Mac OS X 10.15 dan diatasnya, Mac OS X 10.14, Mac OS X 10.13, Mac OS X 10.12, Mac OS X 10.11, Mac OS X 10.10, Mac OS X 10.9, Mac OS X 10.8, Mac OS X 10.7, Mac OS X 10.6, dan Mac OS X 10.5.